Okay, this is going to sound more complicated than it is, but that's because we are breaking it down in to little tiny steps, and assuming you've never touched a 10/22 trigger group before.
1. Remove the factory magazine release. I don't have a picture of this, but you just push out the bottom front and top front pins. You can then remove the magazine release, release plunger and spring, and the ejector. (That's the little metal part that flops around at the top of the group). In the pictures below we also removed the hammer and bolt release plate spring, but you can leave those installed if you like.
 2. Once you have it stripped down, run your tap into the side of the trigger as shown. Even if you buy the kit, we aren't providing a tap holder, so you'll need to have one of those. No need to pre-drill the hole, it's already the right size, and a tap will go easily enough through both metal and polymer groups. If you're doing the aluminum housing, it doesn't hurt to drop a little oil on the tap, but that's not necessary if you are using a new tap. When done, clean out the chips.
 3. Start the half-half dog set screw into the hole you just tapped. If you have it, add a little blue loctite to the threads.
 4. Run in the set screw until it is just below the inside surface of the trigger housing. This is not that important, just be sure that the screw isn't protruding into the trigger housing area.
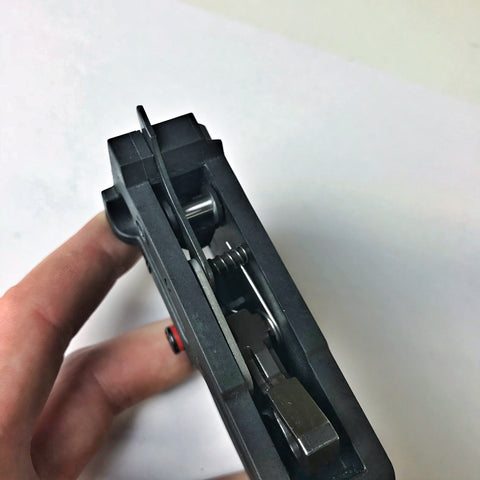
 5. Put the plunger spring onto the plunger, and press it in as shown. Insert the new pull release as shown. Push it in all the way until the holes in the pull release line up with the large holes in the trigger group.
 6. Once you have the pull release aligned, push in the included slave pin. It should look something like this when done.
 7. Next slide in the new auto bolt release. You might have to wiggle it a little to get it in. If you have not removed the hammer, be sure that bolt release spring is up out of the way, and doesn't get pinned down by the bolt release.
 8. It's hard to see in this picture, but you'll want to line up this hole with the set screw, and run the set screw in enough to engage the plate. You don't want to put it in so far that the threads start to 'lift up' the bolt release.
 9. This is what you want it to look like when done. You want at least part of the set screw in the hole, but you want the plate to be able to still sit tight up against the wall of the housing. Put another way, you don't want the set screw pushing on the bolt release; it simply provides something for it to rotate around.
 10. Once you have the bolt release installed, run in the ejector pin and install the ejector as shown. If you removed the hammer, reinstall it, the bolt release spring, and mainspring at this time. Rotate the bolt release spring forward and let it sit on the 'arm' of the bolt release plate. Don't worry about if it sits in the notch or not, doesn't matter.
 11. Install the ejector spring on the protruding ejector pin. This spring will provide pressure on the ejector and the auto bolt release, and keep everything out of the way of the pull release.
 12. This is the only tricky part honestly. I use my left index finger nail to slightly pull away the ejector spring as shown, after I've pressed the ejector pin almost all the way in. Use the thumb nail of your right hand to push the top leg of the auto bolt release spring down, working it past the ejector pin and spring, then press the ejector pin in the rest of the way. You want the ejector spring to be seated neatly on the ejector pin, and the auto bolt release captured underneath it all.
 13. And there you go! It should look something like this when you're all done. When you install this in your firearm, you'll use the factory receiver pin to push out this slave pin.
I'd recommend that you keep the slave pin somewhere safe. You can reassemble this without it. Just hold the trigger group up in the receiver, put the rear receiver pin in, and wiggle the pull magazine release around until all the holes line up, then press in the pin. But it's easier if you have the slave pin.
Check function, and if you have any issues or questions, just let us know!