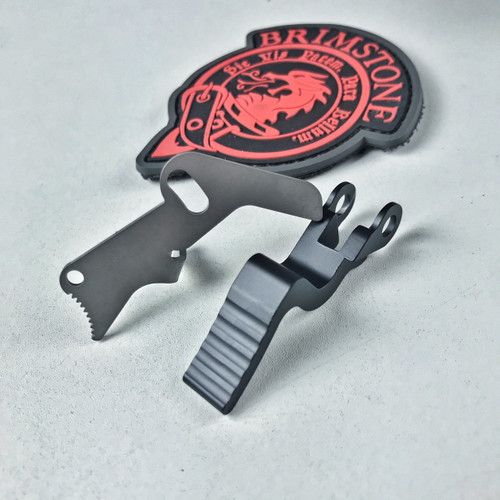
This is our billet machined trigger ONLY. Just the trigger. Not a trigger group. Not a trigger job. Just the trigger, our torsion spring, two set screws, and the tools you need to install it.
Let me repeat. This is just the machined trigger, like in the picture to the. Just so we are all clear. So don't buy this and then complain when ONLY A TRIGGER shows up in the mail. Because I know someone is going to do that...
We include our torsion trigger return spring, set screws, and the necessary drill and tap to install them, with every trigger we sell. If you do not want to use our trigger return system, this trigger shoe will replace your factory BX trigger shoe straight across and will work fine with the factory trigger return system. Feel free to toss the springs and set screws, but obviously that will result in only a cosmetic improvement to your trigger; the function/feel will be unchanged.
This will ONLY work with the BX trigger group! In case you've been living under a rock in the 10/22 world, you're aware that the BX trigger has radically different internal geometry than a normal 10/22 trigger group, while working in the same housing. As such, a standard factory 10/22 trigger blade will not work in a BX group, and the BX trigger blade will not work in a standard factory group.
And let me tell you, our trigger with its torsion spring trigger return system makes a massive difference! The factory BX trigger isn't exactly bad, but it's long and squishy. The torsion trigger return spring is smoother and doesn't stack quite the same as the plunger-based spring that Ruger uses, so instead of just long squishy movement, it helps to make 'stages' in the trigger appear. Of course, without polishing and the rest of the work we do, there will probably still be creep. But this trigger helps a lot. The overtravel stop is also very nice, and it's been our experience that this trigger greatly reduces the pre travel in the trigger as well. Your millage may very on that one, but that's what we are seeing.
THESE ARE NOT DROP IN! They will require some fitting, and if you elect to get the (awesome) trigger return spring kit, that will require permanent modification to your trigger housing. Read the directions below, and make sure that you are comfortable with the work before you order the parts.
(We are working on a video for installing these triggers, but until then all we have is this write up. If you are just installing the trigger, the Brimstone Trigger Fitting Guide is all you'll need. If you are wanting to use our trigger return spring too, you'll ALSO need the Brimstone Trigger Kit Installation Guide)
I think that about covers it. And again... this is just a trigger.
16 Reviews
-
Very nice
Ordered the kit for one of my BX trigger groups that is installed in a custom 10/22 I built for shooting 60gr subsonic ammo.. I already had a spare housing so I had pre-drilled and tapped the holes. My trigger fit perfectly into the trigger housing with NO sanding or mods. Now the sear was a totally different ball game. Had to do some file work in the channel on top of the trigger to allow the sear to move properly. It was a couple of hours worth of filing, assembly and then more filing. I went very slow as I like for things to fit properly. Hand file is the only thing I used. Once the sear was fitting properly I set the overtravel screw (I drilled mine differently that then instructions say. I drilled from the hole in the back of the housing, down and out the hole inside the trigger guard where the return spring normally goes. I did it by hand but a drill press would make it so much easier and guarantee a dead center hit of the hole. I got lucky and nailed it free hand. I had already had work done on this BX trigger and the pull was 1 pound 7 ounces. That didn't change but the overall feel of the trigger now is legit. I love it. The new trigger return spring is very nice as well. Gonna get another one for my other custom 10/22. The cost is well worth it and get the kit. Getting the drill bit, tap, springs and the screws for the overtravel and trigger return are well worth it. The only thing I wish was different is a knurled face on the trigger. But that is no big deal, this thing is worth every penny.
-
Brimstone Custom BX Trigger
Mine dropped right into my BX trigger no problem. The sear was a tight fit but that was a one minute fix with a file and fine sandpaper to smooth things out. Now I have a nice, wide, metal trigger on my super accurate Ruger Charger.
-
Custom Bx Trigger
Great color, precision made. Be prepared to do a little fitting (minor stoning ) the results are great. It feels like it reduced trigger pull but need to check on gage. Will buy again!
-
Solid product
I've got 3 of these in Brimstone trigger jobs alone. Stole the trigger itself from one to put in another BX housing, and had to replace just the trigger. The one I got had some machining problems, but a file straightened that out. This was old stock, and highly unlikely the next guy will end up with this issue. Bought another for my brother in law, installed no problem. The trigger allows for the torsion return spring and the overtravel stop which makes a big difference in trigger feel. This will NOT reduce your trigger pull. His BX pulled at 2lbs before, and at 2lbs after. But the feel is where you see the improvement. No more flexible plastic Ruger trigger, its solid. The flat face gives a consistent pull on how your finger grips the trigger. The fact that you can customize color is just a bonus. I've bought a pair of Bronze, one OD green, one silver, and one Kraken so far. Great products. I would never buy the trigger alone, always the full kit. Installation is easy if you have a cordless drill. Even a cheap one, as you are most likely drilling a plastic housing. Check a Youtube video for where to drill the return spring hole for that set screw. Simple and easy. You will need a Tap handle (Lowes/Home Depot), but a shade tree mechanic could actually get by with a pair of vice grips if it came down to it (remember, you're probably working with a plastic trigger housing). The overtravel stop might look a bit difficult, but its not. You simply drill right through the existing plunger hole. That hole is drilled at an angle from the factory, and the supplied drill bit will go right in there from the bottom. Make sure and thoroughly tape up the bottom of your trigger guard to prevent the bit from scratching/marring it. Maybe even some hard plastic something underneath the tape if you don't have a steady hand. Get that in order, chuck up the bit in a drill, and drill right up through the old return plunger hole and through the back of the trigger guard. You aren't hurting anything. Take your tap and go from the rear of the housing forward to tap in the set screw threads. Once done, take your allen key and insert and thread your return set screw into that hole until it protrudes 1/8" into the trigger guard. From there you can fine tune. Easy, and a nice improvement.


